Creating a Driver
This guide will show an example of creating your own Simulated Weather Sensor Driver.
In this example, you will use the driver template provided to replicate a Simulated Weather Sensor Driver.
Prerequisites
It is highly recommended to use an IDE such as IntelliJ IDEA or Eclipse. IDEs often have great Gradle integration which eases the configuration and build process for your project.
Please make sure you are familiar with OSH through either the Quickstart Guide, or follow the specialized guide to retrieving and learning about the OSH Node Development Template.
It is also highly recommended you check out the dissection of the Driver Template.
Copy the Template
First, we will make a copy of the driver template, and give it a unique name.
Since our driver will be simulated, we can simply name this sensorhub-driver-simulated.

Add to Build Configuration
In order to use IDE features such as code completion, syntax highlighting, and debugging capabilities, make sure Gradle recognizes your driver module.
Project Settings
If the driver is not already added to the project-level settings.gradle, such as through the following code block, then you will need to add it manually.
// Go through each file in "/osh-node-dev-template/sensors", and pick out the ones that are Gradle projects
FileTree subprojects = fileTree("$rootDir/sensors").include('**/build.gradle')
subprojects.files.each { File f ->
    File projectFolder = f.parentFile
    if (projectFolder != rootDir) {
        // Include each subproject to be referenced by this root Gradle project (osh-node-dev-template)
        String projectName = ':' + projectFolder.name
        include projectName
        project(projectName).projectDir = projectFolder
    }
}
Or, if you need to manually add this module to your settings.gradle (only if above is not present):
// Includes the driver as a subproject, simply named by the directory name
include 'sensorhub-driver-simulated'
// Telling Gradle where this driver subproject is located
project(':sensorhub-driver-simulated').projectDir = "$rootDir/sensors/sensorhub-driver-simulated" as File
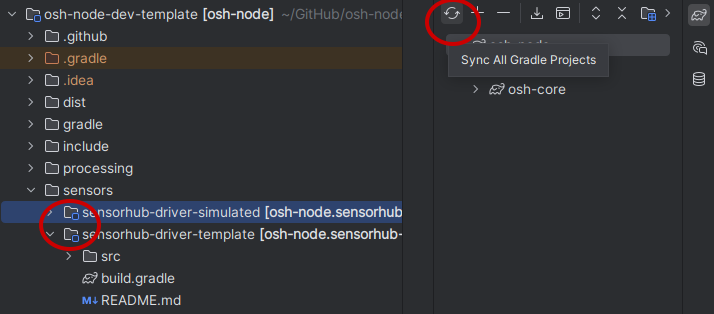
Your IDE should hint that the module is a Gradle project.
This means that the module is recognized through the project-level settings.gradle.
Below shows the blue icon in IntelliJ IDEA which means the module is recognized.
Please refresh Gradle or "Sync All Gradle Projects" if the module is included but not recognized.
Project Build Configuration
Once you have verified that your module is included as a Gradle subproject,
add it to the project-level build.gradle as shown by the highlighted line below.
...
dependencies {
  implementation 'org.sensorhub:sensorhub-core:' + oshCoreVersion
  implementation 'org.sensorhub:sensorhub-core-osgi:' + oshCoreVersion
  implementation 'org.sensorhub:sensorhub-datastore-h2:' + oshCoreVersion
  implementation 'org.sensorhub:sensorhub-service-swe:' + oshCoreVersion
  implementation 'org.sensorhub:sensorhub-webui-core:' + oshCoreVersion
  implementation 'org.sensorhub:sensorhub-service-consys:' + oshCoreVersion
  implementation project(':sensorhub-driver-template')
  implementation project(':sensorhub-driver-simulated')
...
Update Names
Now that the module has been included in our project's build configuration, we can move on to customizing this template.
Package Names
Please provide a logical package name for your module.
For this example, I will use the package name com.mycompany.impl.sensor.simulated, representing some abstract company, and stating that this will be the implementation of a simulated sensor driver.
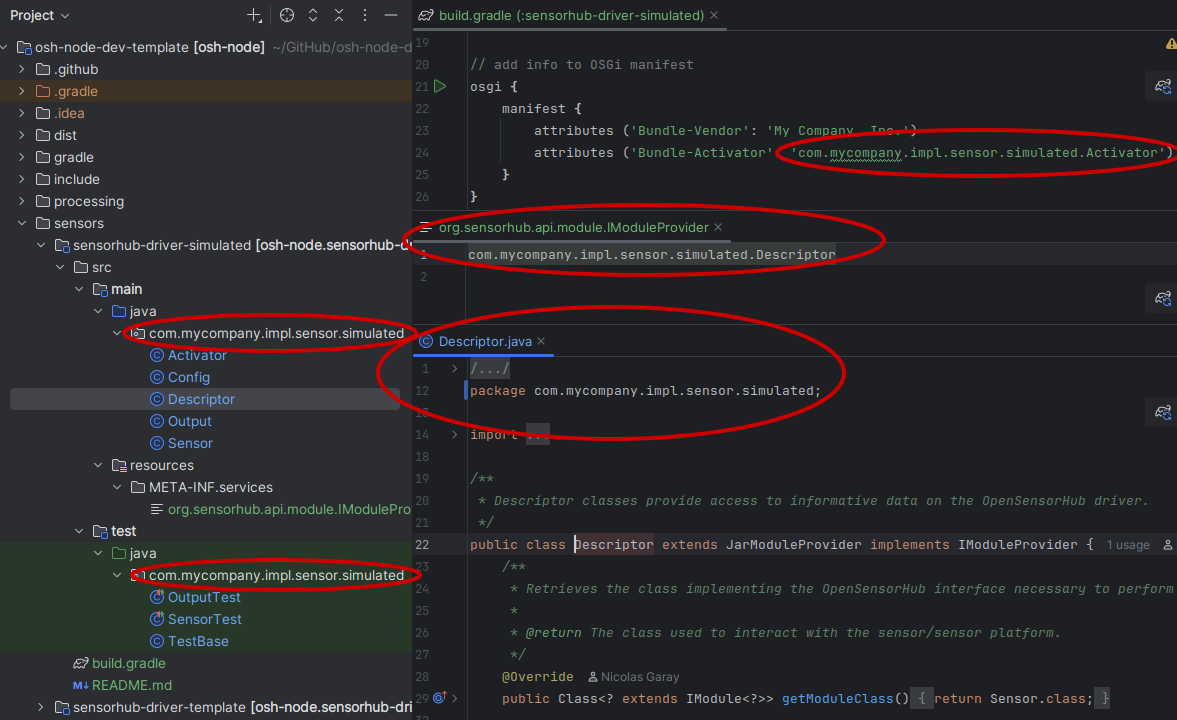
It is important to update this package name in a few different places.
- In all Java files (including test classes), so their declared package is accurate.
- In the
osgitask of the module'sbuild.gradle, under theBundle-Activatorattribute. - In the META-INF/services file
org.sensorhub.api.module.IModuleProvider, to reflect the new path of theDescriptorclass.
Below is an example of some locations for the package name changes.
Gradle
A few lines must be changed in your module's build.gradle to describe the module, and to credit developers and/or organizations for distribution.
The highlighted lines below show some custom information provided for this simulated weather driver.
description = 'Simulated Weather Sensor' // Name of driver/module
ext.details = "A simulated sensor driver publishing random weather outputs" // Details about the module
version = '1.0.0' // You may also provide module versioning here

...
...

// add info to OSGi manifest
osgi {
    manifest {
        attributes ('Bundle-Vendor': 'My Company, Inc.')
        attributes ('Bundle-Activator': 'com.mycompany.impl.sensor.simulated.Activator')
    }
}

// add info to maven pom
ext.pom >>= {
    developers {
        developer {
            id 'johndoe123'
            name 'John Doe'
            organization 'My Company, Inc.'
            organizationUrl 'https://mycompany.com'
        }
    }
}
Readme
Be sure to include up-to-date information regarding your driver in a README.md file.
Some information includes (but not limited to):
- Supported models compatible with the driver
- How to configure the driver/module
- Common errors/troubleshooting
Modify Code
Now, we can modify the template code to create a Simulated Weather Sensor Driver based on this template driver.
We will start with the data structure in our Output class.
Output
A few things need to be specified in our Output class.
- Output Name, Label, Description
- Output Data Structure/Encoding
- Method to Publish Data
We'll start with the first two edits.
Description, Structure, Encoding
Below shows our updated Output's descriptive information, as well as some common weather station observations in our output data structure.
To learn more about creating these SWE Common data structures, please reference the OSH Core SWE Common page.
public class Output extends AbstractSensorOutput<Sensor> {
    static final String SENSOR_OUTPUT_NAME = "simWeatherOutput";
    static final String SENSOR_OUTPUT_LABEL = "Simulated Weather Output";
    static final String SENSOR_OUTPUT_DESCRIPTION = "Data from a simulated weather station";

    private static final int MAX_NUM_TIMING_SAMPLES = 10;

    private final ArrayList<Double> intervalHistogram = new ArrayList<>(MAX_NUM_TIMING_SAMPLES);
    private final Object histogramLock = new Object();
    private final Object processingLock = new Object();

    private DataRecord dataRecord;
    private DataEncoding dataEncoding;

    Output(Sensor parentSensor) {
        super(SENSOR_OUTPUT_NAME, parentSensor);
    }

    void doInit() {
        // Get an instance of SWE Factory suitable to build components
        GeoPosHelper sweFactory = new GeoPosHelper();

        // Create the data record description
        dataRecord = sweFactory.createRecord()
                .name(SENSOR_OUTPUT_NAME)
                .label(SENSOR_OUTPUT_LABEL)
                .description(SENSOR_OUTPUT_DESCRIPTION)
                .addField("sampleTime", sweFactory.createTime()
                        .asSamplingTimeIsoUTC()
                        .label("Sample Time")
                        .description("Time of data collection"))
                .addField("temperature", sweFactory.createQuantity()
                        .definition(SWEHelper.getPropertyUri("AirTemperature"))
                        .label("Air Temperature")
                        .uomCode("Cel"))
                .addField("pressure", sweFactory.createQuantity()
                        .definition(SWEHelper.getPropertyUri("AirPressure"))
                        .label("Air Pressure")
                        .uomCode("hPa"))
                .addField("windSpeed", sweFactory.createQuantity()
                        .definition(SWEHelper.getPropertyUri("WindSpeed"))
                        .label("Wind Speed")
                        .uomCode("m/s"))
                .addField("windDirection", sweFactory.createQuantity()
                        .definition(SWEHelper.getPropertyUri("WindDirection"))
                        .label("Wind Direction")
                        .uomCode("deg")
                        .refFrame(SWEConstants.REF_FRAME_NED, "Z"))
                .build();

        dataEncoding = sweFactory.newTextEncoding(",", "\n"); // We can keep this as our data is easily text encoded
    }
...
Publishing Observations
Now, we can update our setData() method using our newly defined data format.
The highlighted portions show the new parameters for our setData() method,
and the use of those parameters to update and publish a DataBlock.
The DataBlock must be populated in the order that the DataComponent structure was written.
public void setData(long timestamp, double temp, double press, double windSpeed, double windDir) {
    synchronized (processingLock) {
        DataBlock dataBlock = latestRecord == null ? dataRecord.createDataBlock() : latestRecord.renew();

        updateIntervalHistogram();

        // Populate the data block
        dataBlock.setDoubleValue(0, timestamp / 1000d);
        dataBlock.setDoubleValue(1, temp);
        dataBlock.setDoubleValue(2, press);
        dataBlock.setDoubleValue(3, windSpeed);
        dataBlock.setDoubleValue(4, windDir);

        // Publish the data block
        latestRecord = dataBlock;
        latestRecordTime = timestamp;
        eventHandler.publish(new DataEvent(latestRecordTime, Output.this, dataBlock));
    }
}
Sensor
In the Sensor class, we must modify the default UID prefixes to accurately describe our sensor driver.
UIDs
The highlighted portions below show the edited prefixes for the UID and XML ID,
and the lines which generate the IDs using the prefixes and a serialNumber field from the Config class.
public class Sensor extends AbstractSensorModule<Config> {
    static final String UID_PREFIX = "urn:osh:sensor:simulated:";
    static final String XML_PREFIX = "SIMULATED_SENSOR_";

    private static final Logger logger = LoggerFactory.getLogger(Sensor.class);

    Output output;
    Thread processingThread;
    volatile boolean doProcessing = true;

    @Override
    public void doInit() throws SensorHubException {
        super.doInit();

        // Generate identifiers
        generateUniqueID(UID_PREFIX, config.serialNumber);
        generateXmlID(XML_PREFIX, config.serialNumber);

        // Create and initialize output
        output = new Output(this);
        addOutput(output, false);
        output.doInit();
    }
...
Getting Data
For this example, we'll create random measurements within a certain range.
The setup:
...
Random random = new Random();
double[] tempRange = {20.0, 40.0};
double[] pressureRange = {1000.0, 1050.0};
double[] windSpeedRange = {0.0, 5.0};
double[] windDirectionRange = {0.0, 360.0};

private double getRandomDoubleInRange(double min, double max) {
    return random.nextDouble() * (max - min) + min;
}
...
The updated processing thread showing randomly generated data values which are sent to our Output instance.
public void startProcessing() {
    doProcessing = true;

    processingThread = new Thread(() -> {
        while (doProcessing) {

            double temp = getRandomDoubleInRange(tempRange[0], tempRange[1]);
            double press = getRandomDoubleInRange(pressureRange[0], pressureRange[1]);
            double windSpeed = getRandomDoubleInRange(windSpeedRange[0], windSpeedRange[1]);
            double windDir = getRandomDoubleInRange(windDirectionRange[0], windDirectionRange[1]);

            // Simulate data collection and processing
            output.setData(System.currentTimeMillis(), temp, press, windSpeed, windDir);

            // Simulate a delay between data samples
            try {
                Thread.sleep(100);
            } catch (InterruptedException e) {
                Thread.currentThread().interrupt();
            }
        }
    });
    processingThread.start();
}
Unit Tests
Make sure to test your code! Writing unit tests is the easiest way to verify that parts of your code function as intended.
Please see Testing Guide for information and examples of unit tests using JUnit.
In order to run the current unit tests for this module, we'll need to edit some tests with expected values / method changes.
Feel free to include extra unit tests!
public class OutputTest extends TestBase {
    @Test
    public void getRecordDescription() {
        assertTrue(output.getRecordDescription() instanceof DataRecord);

        // Verify that the output's record description has the expected properties.
        var recordDescription = (DataRecord) output.getRecordDescription();
        assertEquals(Output.SENSOR_OUTPUT_NAME, recordDescription.getName());
        assertEquals(Output.SENSOR_OUTPUT_LABEL, recordDescription.getLabel());
        assertEquals(Output.SENSOR_OUTPUT_DESCRIPTION, recordDescription.getDescription());

        // Verify that the record description contains the expected fields.
        assertNotNull(recordDescription.getField("sampleTime"));
        assertEquals("Sample Time", recordDescription.getField("sampleTime").getLabel());
        assertEquals("Time of data collection", recordDescription.getField("sampleTime").getDescription());

        assertNotNull(recordDescription.getField("temperature"));
        assertNotNull(recordDescription.getField("pressure"));
        assertNotNull(recordDescription.getField("windSpeed"));
        assertNotNull(recordDescription.getField("windDirection"));
    }
    ...

    @Test
    public void setData() {
        sensor.stopProcessing();

        // Set some sample data.
        long sampleTime = System.currentTimeMillis();
        double temp = 20;
        double press = 1000;
        double windSpeed = 2;
        double windDirection = 235;
        output.setData(sampleTime, temp, press, windSpeed, windDirection);

        // Get the latest record and pair it with the record description for data access.
        DataBlock latestRecord = output.getLatestRecord();
        DataComponent recordDescription = output.getRecordDescription().copy();
        recordDescription.setData(latestRecord);

        // Verify that the latest record contains the expected data.
        assertEquals(sampleTime / 1000d, recordDescription.getComponent("sampleTime").getData().getDoubleValue(), 0.001);
        assertEquals(temp, recordDescription.getComponent("temperature").getData().getDoubleValue(), 0.001);
        assertEquals(press, recordDescription.getComponent("pressure").getData().getDoubleValue(), 0.001);
        assertEquals(windSpeed, recordDescription.getComponent("windSpeed").getData().getDoubleValue(), 0.001);
        assertEquals(windDirection, recordDescription.getComponent("windDirection").getData().getDoubleValue(), 0.001);
    }
}
Build Project
Now, execute the Gradle build task either in your IDE, or through the command line using ./gradlew build.
Gradle build task in IntelliJ IDEA:
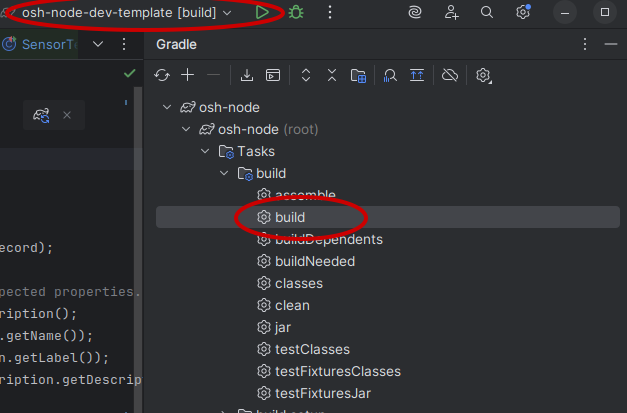
This build process will fail if any of your unit tests fail.
If you choose to build without testing, you may run ./gradlew build -x test.
Pay attention to the errors that come up. Please see the section on Common Errors and Troubleshooting
Debugging
If you wish to debug your module without having to build a .zip distribution every time,
please see the Debugging Guide
Test the Sensor
Time to check out our new driver!
I'll quickly run through steps to check that your driver is working. If you get stuck building/launching/configuring, reference the Quickstart Build Guide, Quickstart Deployment Guide, and User Documentation
- Unzip the freshly built OSH node in
/osh-node-dev-template/build/distributions. - Launch the node with the
launch.batorlaunch.shscript. - Checkout the Admin UI at
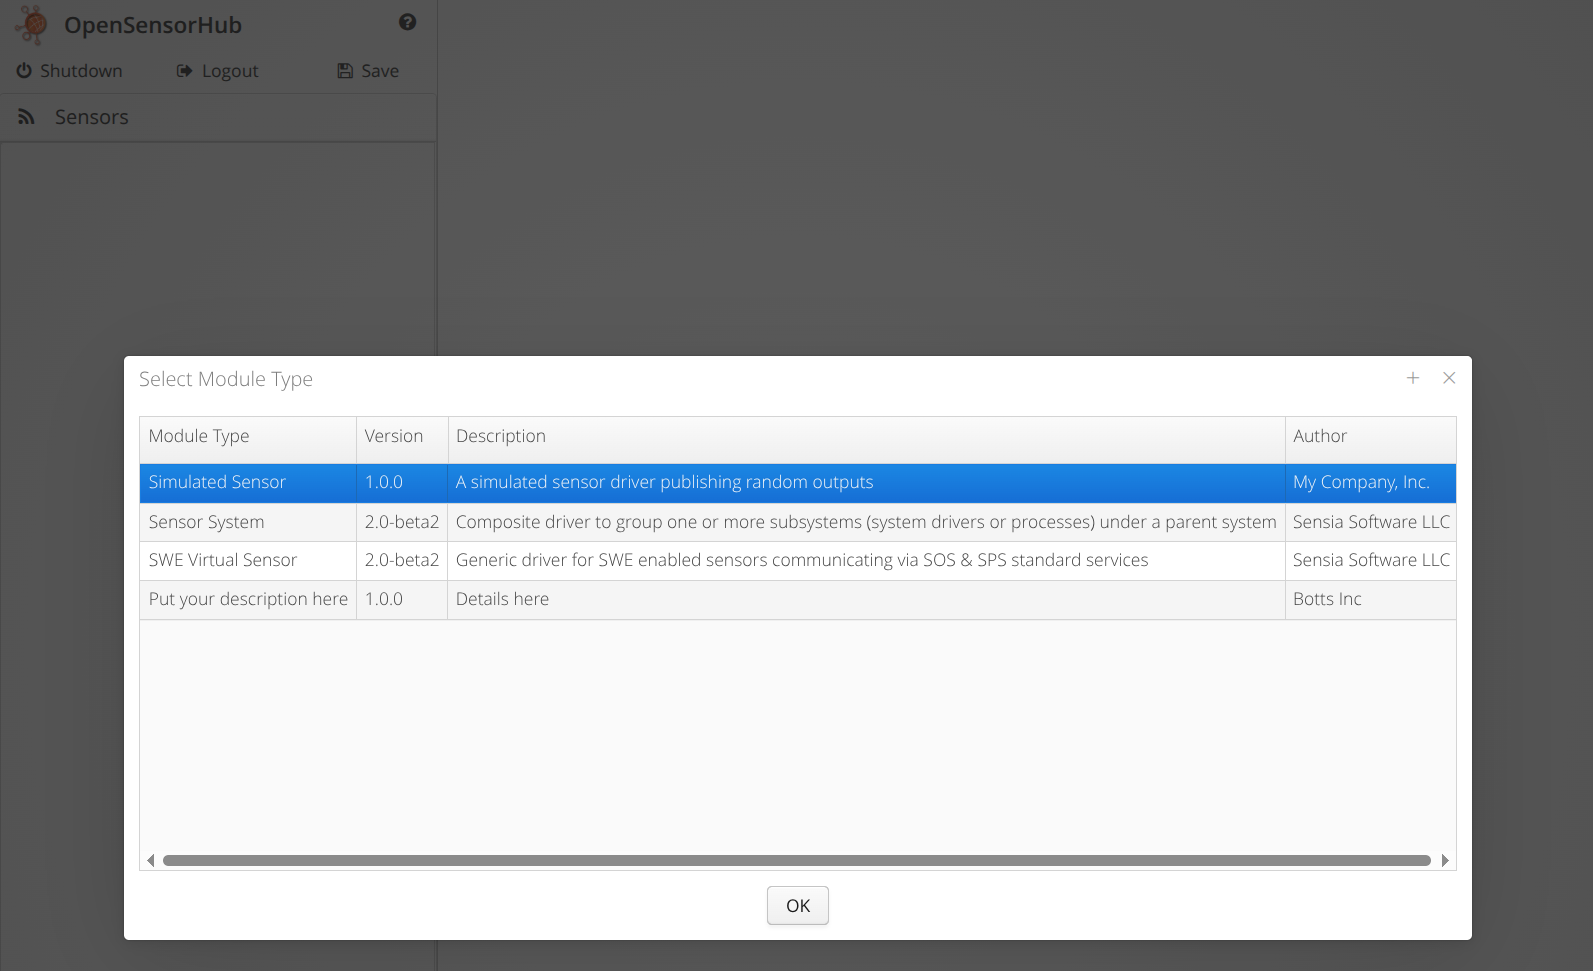
http://localhost:8181/sensorhub/admin(username:admin, password:admin). - Add a new Sensor module, ensuring that your new module exists.
 5. Configure your driver and start it.
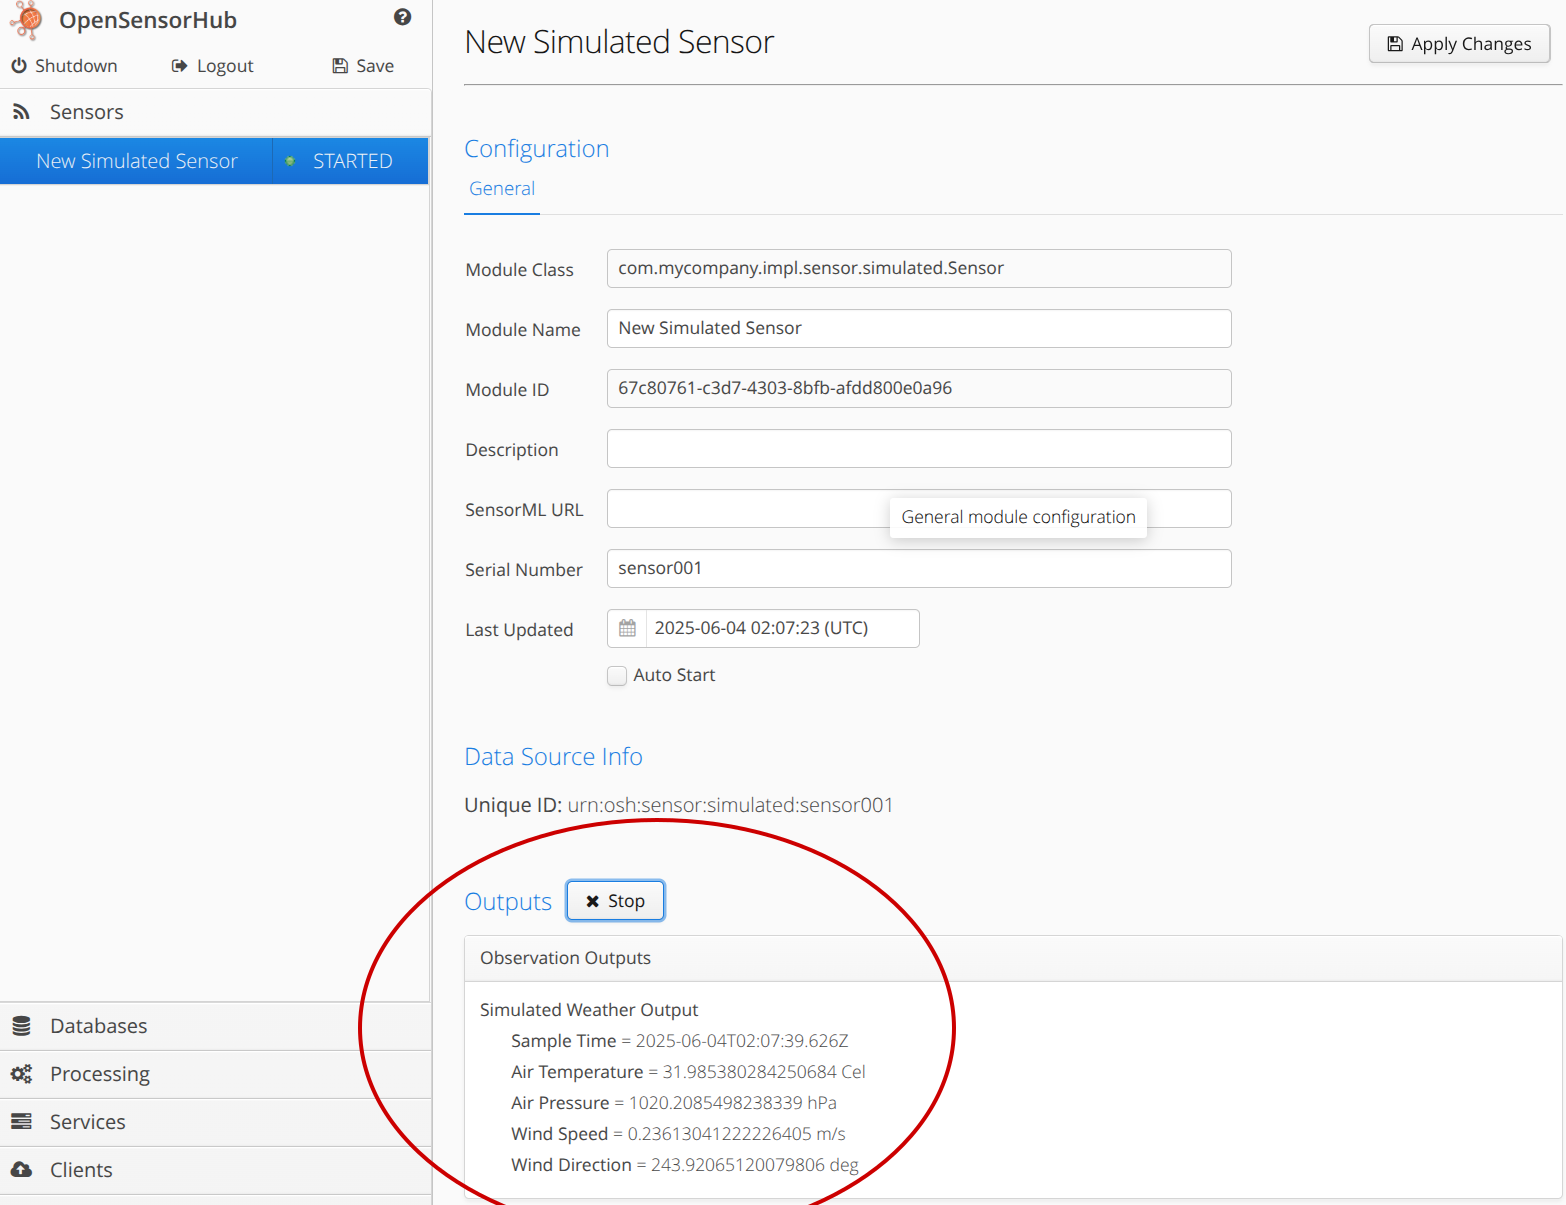
6. Check that the driver is publishing outputs.
5. Configure your driver and start it.
6. Check that the driver is publishing outputs.
Below we can see that the driver is successfully publishing random weather observations, so the driver is working!